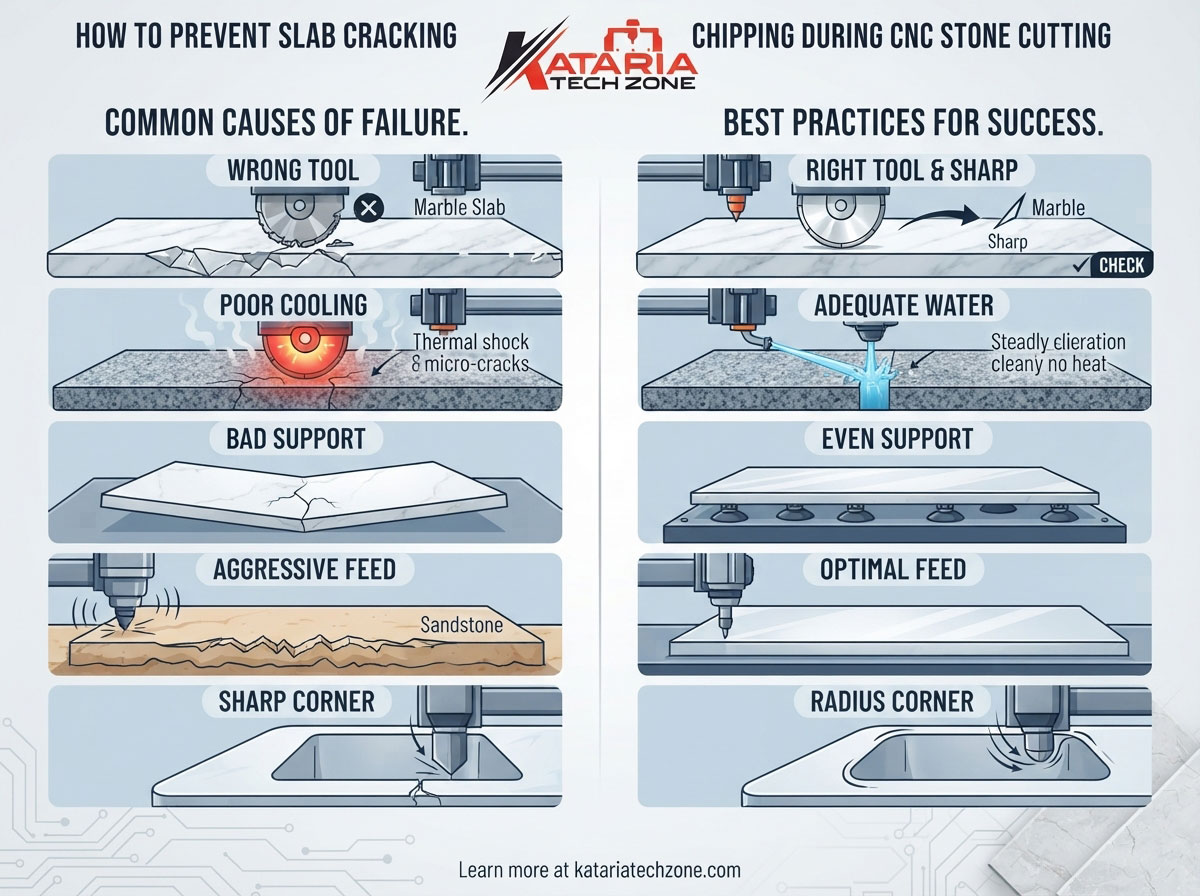
A cracked slab or a chipped edge is one of the most expensive mistakes in a stone workshop. Marble, granite, quartzite and engineered quartz are costly, and a single failed cut can wipe out the profit on a whole job. Most cracking and chipping can be prevented, because it usually comes from a handful of causes: the wrong tooling, poor cooling, bad support, aggressive feeds or a poorly planned toolpath.
At Kataria Tech Zone, we work with fabricators who run CNC stone machines every day. This guide explains why slabs crack and chip, and what to change in your machine, tooling and process to get clean, repeatable results.
1. Why Stone Cracks and Chips
Stone is hard but brittle. It resists compression well and fails easily under tension, impact and sudden temperature change. That one fact explains most cutting failures.
Cracking is usually caused by:
- Natural fissures, veins or fractures already in the slab
- Thermal shock from dry cutting or uneven water flow
- Uneven support, which lets the slab flex under tool pressure
- Stress concentrated at sharp internal corners, sink cutouts and thin sections
- Excessive feed pressure or vibration
Chipping is usually caused by:
- Dull or glazed diamond tools
- The wrong tool type or grit for the material
- A feed rate that is too high for the tool and spindle speed
- Tool run-out and spindle vibration
- Unsupported edges where the tool exits the material
- Poor entry strategy, such as plunging straight into the surface
When you know which of these applies, the fix is usually simple.
2. Inspect the Slab Before Cutting
Prevention starts before the machine runs.
Check for natural defects. Look at the slab under good light, and wet the surface to show hairline fractures. Marble and some granites often carry fissures that are hard to see when dry. Mark them and plan your nest so critical areas, such as narrow bridges around sink cutouts, avoid them.
Check for transport damage. Slabs can pick up hidden cracks in handling. Tap the slab lightly, since a dull sound can indicate a crack, and check the edges for chips.
Let the slab acclimatize. A slab moved from a cold yard into a warm shop and cut immediately can be stressed by the temperature difference. Give it time to settle.
Plan the layout carefully. Keep cuts away from slab edges where possible, and avoid long thin strips that flex easily. Place cutouts so the remaining material stays strong.
3. Support and Clamping
An unsupported slab vibrates and flexes, and both lead to chipping and cracking.
Use a flat, rigid table. The slab must sit evenly over its full area. A table with worn or uneven surfaces creates stress points under the slab, and that stress can turn into a crack mid-cut.
Use vacuum properly. Vacuum holding works well for stone, but it needs clean, intact suction cups and a good seal. Check the pump pressure before each job. Be careful with porous stones, which can leak vacuum, and with small offcuts, which may need extra support.
Avoid over-clamping. Mechanical clamps that are too tight create tension in the slab. Use even, moderate pressure, and place clamps where the cut won’t release the stress suddenly.
Support the offcuts. When a piece is about to separate, its weight can snap the last thin bridge and chip the edge. Support large pieces underneath, or leave small tabs and remove them afterwards.
4. Choose the Right Diamond Tooling
Tooling is the biggest factor in edge quality.
Match the tool to the stone.
- Soft to medium stone (marble, limestone, travertine): a softer-bond, fast-cutting tool works well.
- Hard stone (granite, quartzite): a harder bond lasts longer and cuts consistently.
- Engineered quartz: needs tooling designed for resin-bound material, since heat can melt the resin and damage the edge.
Pick the correct grit and segment design. Coarser grit cuts faster but leaves rougher edges. Finer grit gives better finish but cuts slower and can glaze if pushed. For a finished visible edge, plan a roughing tool followed by a finishing tool.
Keep tools sharp. Diamond tools wear and sometimes glaze, which means the diamonds stop exposing fresh cutting edges. A glazed tool rubs instead of cutting, and the extra heat and pressure cause chipping and cracks. Dress the tool on a suitable abrasive block when it glazes, and replace it when the segments are worn.
Check for run-out. A bent tool or dirty collet creates uneven cutting forces. Clean the tool holder and collet every time you change tools, and discard damaged tools.
Use quality tooling. Cheap tools save money per piece but often cost more through chipped slabs and shorter life. Compare cost per metre cut, not purchase price.
For details on how tool material affects results, read our related article: [Diamond Tooling vs. Carbide Tooling for CNC Marble and Granite Engraving – PASTE URL].
5. Speed and Feed Settings
Correct spindle speed and feed rate keep cutting forces low and consistent.
Spindle speed. Follow the tool manufacturer’s recommended RPM or surface speed for the tool diameter. A speed that is too low makes the tool push against the stone, while one that is too high can overheat the tool and cause vibration.
Feed rate. This is the most common source of chipping. Pushing too fast overloads each diamond and the stone breaks instead of being ground away. Too slow can polish the tool and cause glazing and heat. Start conservatively and increase in small steps while watching edge quality.
Depth of cut. Don’t cut full depth in a single pass on thick slabs. Multiple shallow passes reduce the load on the tool and the stone, and they cut vibration.
Slow down at critical points. Reduce feed on entries, exits, corners and thin sections. Many machines allow lower feed on specific segments of the toolpath.
Test on offcuts. Every stone batch is different. Run a test cut on offcut material and adjust before running the real slab.
Because stone varies so much, always use the tool supplier’s recommended parameters as your starting point.
6. Cooling and Water Management
Water is essential in stone cutting. It cools the tool, flushes slurry and reduces dust.
Provide enough water, aimed correctly. Direct the water at the cutting point, so it reaches the contact area between the tool and the stone. Poor flow lets the tool overheat and the stone suffer thermal shock.
Keep the flow consistent. An interrupted water supply in the middle of a cut can cause sudden temperature changes, and that can crack the slab. Check the pump, filters and nozzles before starting.
Keep the water clean. Dirty recirculated water carries abrasive slurry that wears nozzles and tools. Maintain your settling tanks and filters.
Watch the temperature difference. Very cold water on a hot tool or a warm slab adds stress. Use water at a stable, moderate temperature where possible.
Protect the machine. Make sure seals, bearings and electrical parts are suitable for wet stone cutting, and clean slurry from rails and guides regularly.
7. Toolpath Strategies That Protect the Stone
Smart programming prevents many problems before the tool touches the slab.
Use lead-ins and lead-outs. Don’t plunge straight into the final edge. Enter the cut on waste material or with an arc, which reduces shock on the stone.
Avoid sharp internal corners. Square internal corners concentrate stress and are a common crack starting point, especially in sink and cooktop cutouts. Use generous radii, and make them larger than the minimum your tool allows. Many fabricators cut a larger corner radius or drill relief holes in the corners.
Choose climb or conventional cutting deliberately. Test which gives the better edge for your tool and stone, and use it consistently on visible edges.
Rough, then finish. Remove most of the material with a roughing pass and leave a small allowance for a light finishing pass. The finishing pass takes less force and gives a cleaner edge.
Cut in a sensible order. Remove internal cutouts and relieve stress before cutting the outer shape, and plan so the slab stays supported as long as possible. Avoid leaving a long thin strip that can snap.
Use tabs or bridges. Small holding tabs keep parts in place until the cut finishes, and you can break or trim them afterward.
Watch narrow sections. Areas such as the front rail around a sink cutout are the weakest part of a countertop. Keep adequate width and consider reinforcement where the design requires it.
8. Machine Condition and Maintenance
A tired machine cannot produce good stone cuts.
Spindle condition. Worn spindle bearings cause run-out and vibration. Listen for noise, and check run-out regularly.
Rails and guides. Slurry and dust wear linear guides. Clean and lubricate them to keep motion smooth, since any backlash or jerk shows up in the edge.
Machine rigidity. Loose bolts, worn couplings or a frame that isn’t level add vibration. Check the machine’s geometry and leveling periodically.
Vacuum system. Maintain pumps, hoses and seals so holding force is consistent.
Cooling system. Clean nozzles and check pumps and filters. A clogged nozzle can starve the cut of water without you noticing.
Regular calibration. Check axis squareness and tool length settings so depth and position are accurate.
If you’re considering new equipment, explore our range of CNC stone router machines built for stone work. For workshops that cut wood, MDF and composites as well, see our CNC router machines. You can also browse the full machine catalogue.
9. Material-Specific Tips
Marble. Marble is softer but often contains veins and natural fissures. Inspect carefully, use sharp tools, keep feed moderate and support the slab fully.
Granite. Granite is hard and abrasive. It needs the right bond and good cooling. Granite is more forgiving of fissures than marble, but thermal shock and dull tools still cause chipping.
Quartzite. Quartzite is very hard and can be unpredictable. Use quality tooling, slower feeds and plenty of water.
Engineered quartz. The resin content means heat is the main risk. Keep cooling consistent and avoid dwelling in one spot, since overheated resin damages the edge.
Limestone, travertine and onyx. These are softer and more fragile, and often have voids or fills. Use gentle feeds and support the slab well. Onyx in particular is brittle.
Thin slabs and large formats. Thin material flexes easily. Support it fully, and consider cutting slower with smaller passes.
10. Troubleshooting Table
| Problem | Likely cause | Fix |
|---|---|---|
| Chipping along the top edge | Dull tool, feed too fast | Dress or replace the tool, reduce the feed |
| Chipping at the exit point | Unsupported edge | Add support or tabs, slow down at the exit |
| Crack starting at an internal corner | Sharp corner stress | Use a larger radius or relief holes |
| Crack running along the cut | Thermal shock, weak support | Improve water flow, support the slab evenly |
| Burn marks or glazing on the tool | Low feed, poor cooling | Increase the feed slightly, check the water |
| Rough, wavy edge | Vibration or run-out | Check the spindle, collet and tool balance |
| Slab shifting during cut | Poor vacuum or clamping | Check the vacuum seals and pressure |
| Chipping on one material only | Wrong tool for that stone | Switch the bond or grit type |
11. FAQs
Why does my granite chip even with a new tool?
Check the feed rate, water flow and tool run-out. A new tool can still chip if it is overfed or poorly cooled.
Can I cut stone dry on a CNC machine?
Wet cutting is normal for most stone work. Dry cutting generates heat and dust and shortens tool life. Use only tools and procedures designed for dry cutting, with suitable dust extraction.
How do I stop cracks around sink cutouts?
Use generous corner radii or relief holes, keep adequate width in narrow sections, support the slab fully, and avoid sudden stress when the cutout piece releases.
How often should I replace diamond tools?
It depends on the stone, the volume and the tool quality. Replace when cutting speed drops, edge quality worsens or segments are worn down.
Does feed speed really matter that much?
Yes. Feed rate is one of the biggest factors in chipping, so test and adjust on offcuts.
Can a CNC router cut stone?
Yes, with a machine built for it: rigid, water-protected and fitted with suitable spindles and tooling. See our guide to [getting started with CNC routers – PASTE URL] for the basics, and our comparison [CNC Router vs. Traditional Woodworking Tools – PASTE URL] to understand where CNC adds value.
12. Conclusion
Preventing slab cracking and chipping comes down to consistent habits:
- Inspect each slab and plan your layout around defects.
- Support and hold the slab evenly.
- Choose the right diamond tooling and keep it sharp.
- Run sensible speeds and feeds, tested on offcuts.
- Keep cooling steady and well aimed.
- Program smooth entries, generous corner radii and sensible cutting order.
- Keep your machine in good mechanical condition.
Small changes in these areas add up to fewer ruined slabs, less rework and better edge quality, and that directly improves your margins.
At Kataria Tech Zone, we help fabricators and workshops choose machinery that fits their material and production needs. Explore our CNC stone router machines, or read more guides on our blog. If you’d like advice on the right machine for your workshop, contact the Kataria Tech Zone team today.