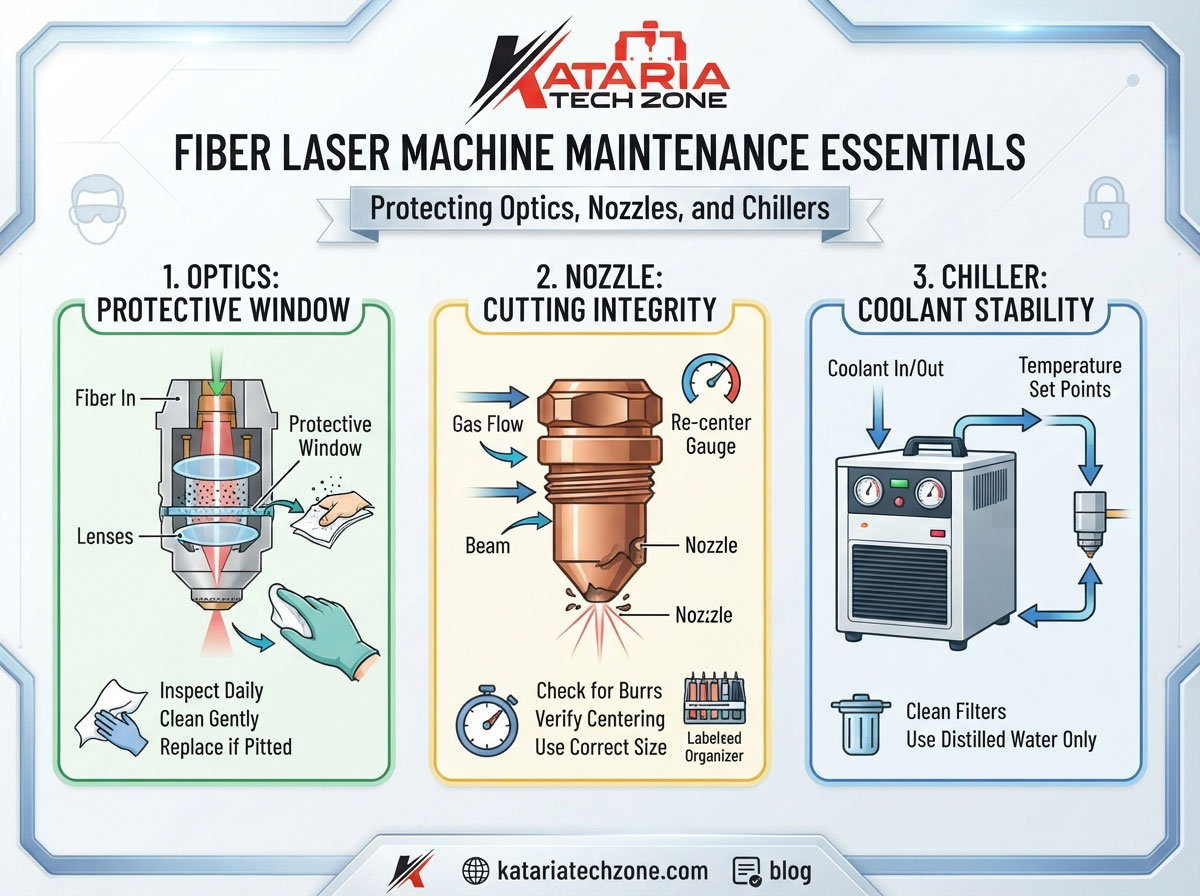
A fiber laser cutting machine can run for years with very little fuss, but only if the small things are looked after. A speck of spatter on a lens, a nozzle with a burr, or coolant that has drifted a few degrees too warm can turn a clean, fast cut into rough edges, dross and unplanned downtime. Worse, the same small neglect can damage components that cost far more than the consumables that would have prevented it.
This guide from Kataria Tech Zone explains fiber laser machine maintenance in practical terms. You will learn how to protect the optics, keep nozzles in cutting shape and keep the chiller stable. You will also get a ready-to-use schedule, a troubleshooting table and answers to common questions. For more shop-floor advice on machinery care, browse the Kataria Tech Zone blog.
Why Fiber Laser Machine Maintenance Matters
Fiber lasers are popular because they are fast, efficient and have no mirrors to align. But “low maintenance” is not “no maintenance.” Regular care pays back in five ways:
- Consistent cut quality. Clean optics and a true nozzle keep the beam and gas flow where they should be.
- Higher uptime. Most breakdowns start as small, visible problems that a daily check would have caught.
- Longer component life. Protective windows and nozzles are cheap. Focus lenses and laser sources are not.
- Lower running cost. A machine running within its temperature and gas conditions wastes less power, gas and material.
- Safer operation. A contaminated lens can overheat and fail, and a leaking chiller or gas line is a hazard.
The three areas that decide most of this are the optics, the nozzle and the chiller.
Safety First: Before You Touch Anything
Fiber lasers are Class 4 industrial machines. Follow these rules every time:
- Switch off and lock out power before servicing the cutting head or chiller.
- Never look into the beam path, and never work on the head with the source active.
- Use laser safety eyewear rated for your machine’s wavelength (fiber lasers typically operate around 1 micron) whenever a beam could be present.
- Read your manufacturer’s manual. Set points, cleaners and intervals differ between brands, and the manual always wins over general advice.
How the Beam Path and Cooling Fit Together
Understanding the layout makes maintenance logical. The laser source generates the beam, which travels through a delivery fiber to the cutting head. Inside the head, a collimating lens straightens the beam, a focusing lens concentrates it, and a protective window at the bottom shields both. Below that sits the nozzle, which shapes the assist gas and lets the beam exit. The chiller circulates coolant to keep the source and the head within their temperature range.
Contamination or heat at any point in this chain affects everything after it. That is why the protective window, the nozzle and the chiller get the most attention.
Protecting the Optics
The Parts That Matter
- Protective window (cover slide): a replaceable glass disc that takes spatter, dust and fumes so the lenses behind it do not.
- Focusing lens and collimating lens: precision components that are expensive and easily damaged.
- Fiber connector (QBH or equivalent): the point where the delivery fiber enters the head. It must stay spotless.
Daily Inspection
At the start of every shift, remove the protective window and hold it up to a bright light. Look for spatter dots, haze, fingerprints, discoloration or tiny pits. Also glance at your air and gas lines. A dirty window is often the first sign of a wider contamination problem.
How to Clean a Protective Window
- Power down and lock out the machine, and work on a clean, well-lit bench.
- Wear powder-free gloves or finger cots. Skin oil burns into glass under laser power.
- Blow off loose dust with a clean air blower or bulb. Never blow with your mouth.
- Apply cleaner to a fresh lens tissue, not directly to the glass. Use high-purity isopropyl alcohol or the cleaner your manufacturer approves.
- Wipe once in a single direction, then discard the tissue. Do not scrub or circle.
- Inspect again under light. If marks remain, the window is likely damaged, so replace it.
- Refit carefully, checking that the seal or O-ring seats properly so no dust or gas can leak around it.
When to Replace Instead of Clean
Replace the protective window immediately if you see pitting, cracks, burn marks or a haze that will not wipe off. It is far cheaper than running a damaged window, which can cause thermal lensing (the lens heats, distorts and shifts the focus) and pass damage on to the focusing lens. Keep at least one or two spare windows at the machine.
Preventing Optics Contamination
- Use dry, oil-free compressed air. Fit a proper dryer and filters, and drain moisture regularly.
- Choose suitable assist gas. High-purity nitrogen (commonly 99.99% or better) and clean oxygen prevent moisture and oil from reaching the head.
- Keep the fiber connector capped whenever it is disconnected, and only open the head in a clean area.
- Avoid dusty surroundings. Workshops with grinding, sanding or woodworking dust should keep the laser area separated. If you run woodworking machines nearby, see how our CNC router machines pair with proper dust collection so fine dust never reaches sensitive equipment.
- Handle lenses by the edges only, and store spares in their original sealed cases.
Caring for Nozzles
The nozzle is small, but it decides cut quality. It focuses the assist gas into the kerf, blows molten metal away and protects the lens from back-spatter. Any damage disturbs gas flow, which causes dross, burrs, wider kerf and inconsistent piercing.
What to Check
- Orifice shape. Look for roundness, burrs, dents or spatter buildup. Even a slightly oval opening changes gas flow.
- Cleanliness. Remove spatter carefully with the right tool, never a hard object that scratches the bore.
- Seal and threads. Make sure the nozzle seats firmly, and check O-rings and the ceramic or sensing ring for cracks.
- Size match. Use single-layer or double-layer nozzles and diameters as recommended for your material, thickness and gas.
Centering the Nozzle
After every nozzle change, verify that the beam exits through the centre of the opening. An off-center beam can burn the nozzle, cut unevenly in different directions and reduce piercing quality. Use your controller’s nozzle centering function, or the manufacturer’s test-cut method, and repeat it whenever cut quality looks direction-dependent.
Nozzle Best Practices
- Keep a labeled organiser of spare nozzles by size and type.
- Replace a nozzle that is bent, cracked or heavily spattered rather than “nursing it along.”
- Set correct piercing height and standoff to reduce spatter climbing onto the nozzle.
- Match gas pressure to the nozzle and job, since the wrong setting increases dross and wastes gas.
Keeping Chillers Healthy
The chiller is the quiet workhorse of a fiber laser. Most industrial chillers have two temperature circuits, one for the laser source and one for the optics and head, and both need to stay within the range set by the manufacturer. Heat is what damages sources and coatings, and the wrong temperature can also create condensation.
Water and Coolant
Use distilled or deionized water, or the coolant the manufacturer specifies. Tap water carries minerals that cause scale, corrosion and blocked passages. Check the level daily and replace coolant on the manufacturer’s schedule, often every few months depending on usage and water quality. Change the deionizing filter cartridge when it is exhausted.
Temperature Set Points and Condensation
Set points vary by brand, so follow your manual exactly. Do not set coolant temperatures below the ambient dew point, because condensation can form on optics and electronics, which can lead to serious damage. In humid climates or monsoon seasons, this matters even more.
Filters and Airflow
- Clean the water strainer regularly to keep flow rates healthy.
- Clean the condenser and dust filters often. Clogged fins force the chiller to work harder and trigger high-temperature alarms.
- Keep space around the chiller for airflow, and avoid placing it near heat sources or dusty areas.
Alarms and Seasonal Care
Never bypass flow, level or temperature alarms. Stop the machine, find the cause, then restart. In cold environments, use an approved antifreeze mixture to protect against freezing. Have the refrigeration system inspected by a qualified technician yearly.
Fiber Laser Maintenance Schedule
| Frequency | Optics | Nozzle | Chiller and Gas |
|---|---|---|---|
| Daily | Inspect protective window | Check shape, spatter, seating | Check level and temperature; drain air moisture |
| Weekly | Check head seals and connector cap | Clean and re-center if needed | Clean dust filters; inspect hoses |
| Monthly | Inspect lens condition | Verify centering and sensor ring | Clean water strainer |
| Quarterly | Full head inspection | Replace worn nozzles | Change coolant and DI filter as advised |
| Annually | Professional optics check | Review nozzle stock | Service refrigeration; check flow and pressure |
Quick Troubleshooting Guide
| Symptom | Likely cause | What to check |
|---|---|---|
| Rough edges, heavy dross | Dirty window, damaged nozzle, low gas purity | Window, nozzle, gas supply |
| Cut quality differs by direction | Off-center nozzle | Nozzle centering |
| Weak or inconsistent piercing | Contaminated optics, wrong height | Window, standoff setting |
| Chiller high-temperature alarm | Clogged filters, low coolant, hot room | Condenser, level, ventilation |
| Condensation in the head | Coolant too cold for the humidity | Set point vs. dew point |
| Sudden power drop | Damaged window or lens | Stop and inspect the optics |
Common Maintenance Mistakes
- Cleaning with household products or dirty cloths, which scratch and smear.
- Running a damaged window “just for this job.”
- Using tap water in the chiller.
- Skipping the maintenance log, so no one sees trends.
- Ignoring small air or coolant leaks.
- Untrained staff changing lenses in a dusty area.
Build a Maintenance Habit
The most effective step is also the simplest: write it down. Keep a maintenance log beside the machine with dates, replaced parts, chiller readings and cut-quality notes. Assign clear responsibility for the daily checks, and train every operator to clean and change the protective window correctly. Patterns such as windows dirtying faster than usual point to problems in the air supply or setup before they become failures.
Know your limits, too. Source servicing, fiber replacement, refrigerant work and optics realignment belong to qualified technicians.
Why Preventive Care Fits Every Workshop
Whether you fabricate sheet metal, signage or architectural elements, the same discipline protects every machine on your floor. If you are also planning your equipment, explore our complete machinery range, our CNC stone router machines and our guides such as Getting Started with CNC Routers for Woodworking and CNC Router vs. Traditional Woodworking Tools. If you work with metal-clad panels, our article on why ACP is perfect for CNC routing covers materials, thickness and sheet sizes.
Frequently Asked Questions
How often should I clean the protective lens on a fiber laser?
Inspect it every shift. Clean it when you see dust or light spatter, and replace it if it is pitted, hazy or cracked.
Can I use tap water in a fiber laser chiller?
No. Use distilled or deionized water, or the coolant your manufacturer specifies. Tap water causes scale and corrosion.
What causes dross on a fiber laser cut?
Common causes are a damaged or off-center nozzle, dirty optics, wrong gas pressure or low gas purity. Check those first.
How often should I change chiller coolant?
Follow your manual. Typically it is every few months, sooner in hot, dusty conditions.
Is fiber laser maintenance something my operators can do?
Daily checks, window cleaning, nozzle changes and chiller upkeep are operator tasks once trained. Leave source and refrigeration service to qualified technicians.
Conclusion
Protect the optics, keep the nozzle true and keep the chiller stable, and your fiber laser will reward you with cleaner cuts, lower running costs and fewer surprises. The routine is simple: inspect daily, clean gently, replace early and record everything.
For more practical guides, visit the Kataria Tech Zone blog or explore our shop to find the right machinery for your workshop. Contact the Kataria Tech Zone team for advice on selecting and maintaining equipment.