You finish a batch of kitchen cabinet doors, the edges look perfect, and a week later the customer sends a photo of a lifting corner. Few defects damage a furniture workshop’s reputation as fast as edge band tape peeling. It looks cheap, lets moisture into the panel, and turns a profitable job into rework.
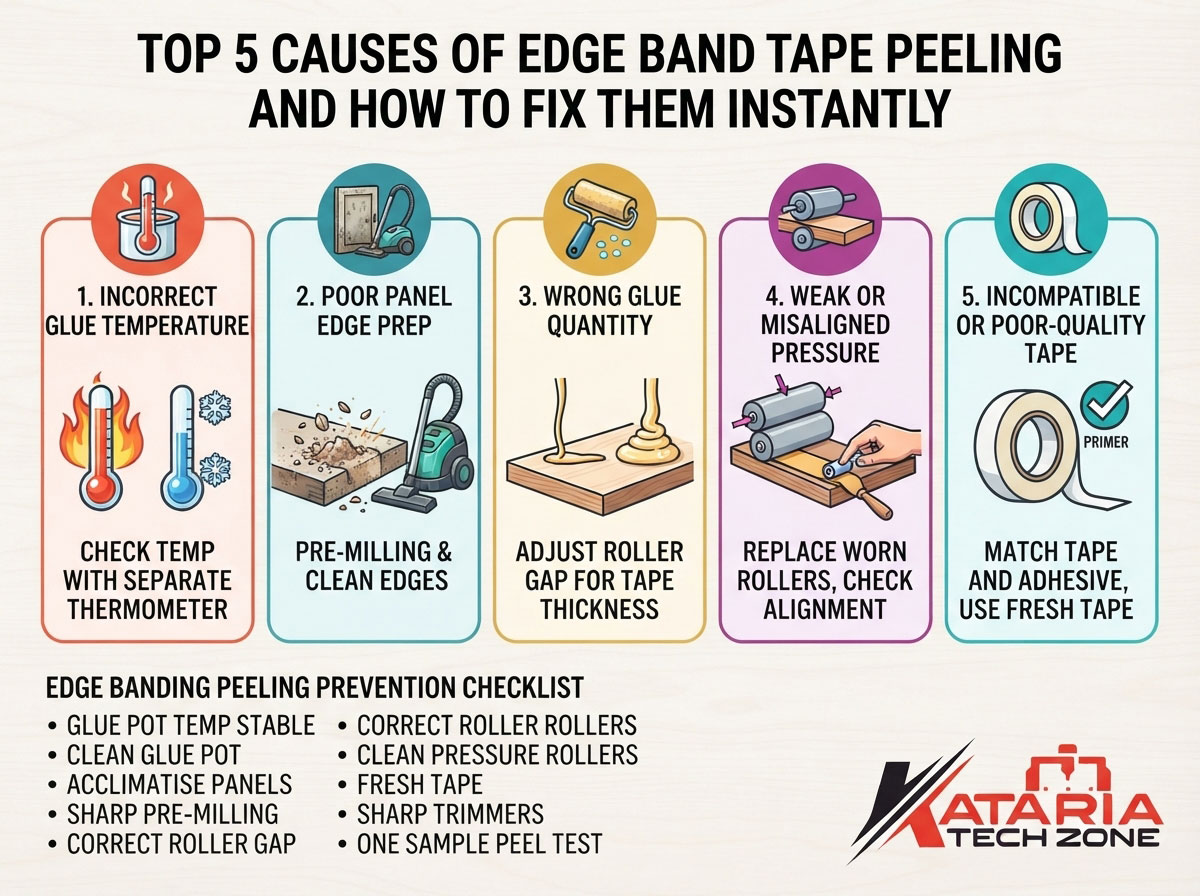
The good news is that peeling almost never happens at random. In most workshops it traces back to a handful of causes: glue temperature, panel preparation, glue quantity, pressure, and tape quality. At Kataria Tech Zone, we work with woodworking and panel-processing machinery, and the same few issues come up again and again. This guide covers the top five causes of edge banding peeling off, with a quick fix for each and a prevention checklist so it stays fixed.
Quick answer: Most edge band peeling comes from glue applied at the wrong temperature, dirty or poorly prepared panel edges, too little or too much glue, weak or misaligned pressure rollers, or incompatible and badly stored tape. Correct these five points and most peeling problems disappear.
How Edge Banding Adhesion Actually Works
Knowing the basics makes troubleshooting much faster. On an edge banding machine, hot-melt adhesive is applied to the tape or the panel edge. The adhesive must stay molten long enough to wet both surfaces and flow into the pores of the board. Pressure rollers then press the tape onto the edge, and the glue cools and solidifies into a mechanical and chemical bond.
That process depends on four things working together: temperature, surface condition, glue volume and pressure. If any one fails, the bond is weak from the start, even if it looks fine on the day. This is why peeling often shows up days or weeks later, when heat, humidity or a knock loads the joint.
Cause 1: Incorrect Glue Temperature
Why it causes peeling: This is the most common cause we see. Hot-melt adhesive only works within a specific temperature window.
- Too cold: The glue is too thick to wet the panel edge. It “skins over” before the roller presses the tape, so it grips only the surface and lets go under stress.
- Too hot: The glue can char, lose strength and turn brittle. Overheated adhesive also thins out too much and soaks into the board instead of forming a bond line.
Many EVA hot-melts run at roughly 180–200 °C, while PU-type (PUR) adhesives run lower and behave differently. Always follow your adhesive manufacturer’s data sheet, since the correct range depends on the product.
Warning signs: Glue strings, smoke or a burnt smell, dark or crusty adhesive in the pot, or tape that peels off cleanly with almost no glue on the panel.
Instant fix:
- Check the glue pot temperature against the adhesive data sheet, and confirm the thermostat reading with a separate thermometer.
- Allow full warm-up time before starting production, especially on cold mornings.
- Empty and clean the glue pot regularly, because old, carbonised glue never bonds properly.
- Avoid mixing different adhesive types or topping up old glue with new.
Prevent it: Schedule pot cleaning, use the recommended adhesive grade for your tape material, and keep a log of temperature settings for each material.
Cause 2: Poor Panel Edge Preparation
Why it causes peeling: Glue can only grip a clean, sound surface. If the edge is dusty, oily, damp or crumbling, the adhesive bonds to the contamination instead of the board.
Common preparation problems include:
- Sawdust and fine dust left on the edge after cutting.
- Chipped or torn edges from a blunt saw blade or poor cutting, which leave voids the glue cannot fill.
- Moisture in the panel. Boards that have absorbed humidity give weak, unpredictable bonds, so as a rough guide, check that MDF and particleboard sit around 8–10% moisture content.
- Cold panels brought straight from a cold store or truck. The glue chills the moment it touches the edge.
- Oil, silicone or release agents transferred from handling or other processes.
Instant fix:
- Blow off or vacuum the edges before they reach the glue station.
- Make sure the pre-milling unit is switched on and its cutters are sharp. Pre-milling removes a thin layer to give a fresh, square, clean edge.
- Let panels acclimatise to shop temperature before banding. As a rule of thumb, keep both panels and workshop at about 18 °C or above.
- Wipe off any oil or residue with a suitable cleaner before banding.
A note for CNC users: If you cut panels on a CNC router, the cut quality decides how well the edge takes glue. A worn bit or aggressive feed leaves a fuzzy, torn edge that bonds poorly. Sharp tooling and a light finishing pass help, and pre-milling still matters. Explore our CNC router machines if you are upgrading your panel cutting.
Cause 3: Wrong Glue Quantity (Too Little or Too Much)
Why it causes peeling: The ideal glue line is thin, continuous and even. Both extremes cause problems.
- Too little glue creates a “starved” joint. Dry patches or gaps mean the tape is only partly bonded, and corners and ends lift first.
- Too much glue creates a thick, weak glue line. Excess glue squeezes out, contaminates trimming knives and scrapers, and a thick layer of cooled adhesive is less strong than a thin one. It also leaves a visible dark line at the joint.
Warning signs: Bare patches on the peeled tape, uneven glue distribution across the edge, glue squeeze-out along the joint, or glue smears on the panel face.
Instant fix:
- Adjust the glue roller gap according to your tape thickness. Thicker or more porous edges (like MDF or particleboard) usually need slightly more adhesive.
- Clean the glue roller so it applies evenly, since a dirty or worn roller leaves streaks.
- Confirm the glue pot level is stable, because a nearly empty pot cools quickly and applies unevenly.
- Run a test piece and peel the tape back by hand. A good bond leaves an even film of glue on both the tape and the panel.
Prevent it: Keep a setup sheet for each tape thickness and board type so operators repeat proven settings instead of guessing.
Cause 4: Weak or Misaligned Pressure
Why it causes peeling: After glue application, the tape has only seconds to be pressed into the edge before the adhesive cools. Weak, worn or badly aligned pressure rollers leave gaps and poor contact, and two related problems make it worse:
- Feed speed too high. The glue cools before the tape is fully pressed.
- Delayed pressing. A long gap between the glue station and pressure unit lets the glue skin over.
Warning signs: Tape that lifts mainly at the leading and trailing ends, roller marks on the tape, uneven contact along the edge, or a joint that opens up under light pressure.
Instant fix:
- Check that pressure rollers are aligned and that the panel is fully supported against the fence.
- Replace worn or hardened rubber rollers. A roller that has flattened or cracked cannot press evenly.
- Slow the feed speed to match glue temperature and tape type, then increase gradually while testing bond strength.
- Confirm the end-trimming and corner units are not knocking the tape loose as it passes.
Prevent it: Include roller inspection in your weekly maintenance routine, and never run the machine at maximum speed with an unproven setup.
Cause 5: Incompatible or Poor-Quality Edge Tape
Why it causes peeling: Not every tape bonds with every adhesive or board. Common issues include:
- Unprimed tape used with an adhesive that needs a primed surface.
- Mismatched materials. For example, using a glue that suits PVC on PP or ABS tape, or a tape that is not designed for the panel surface.
- Old or badly stored tape. Tape stored in damp, hot or dusty conditions picks up moisture and contamination that block adhesion.
- Wrong thickness for the machine setup. Thicker tape needs more heat and pressure to form a good bond.
- Cheap, inconsistent tape with variable backing quality from roll to roll.
Instant fix:
- Confirm your tape and adhesive are a recommended pair, and check whether the tape has a primer coating.
- Store rolls sealed, off the floor, away from heat and moisture.
- Use fresh tape for critical jobs, and test each new batch before running a full production.
- Keep the tape at shop temperature before use, like the panels.
Prevent it: Buy from consistent suppliers, label rolls with the date received, and use older stock first.
Bonus: Post-Processing Mistakes That Look Like Peeling
Sometimes a good bond is broken after gluing. Blunt trimming knives, scrapers set too aggressively or a poorly adjusted buffing unit can pull at the tape and start a lift. If peeling begins at the trimmed edge instead of the glue line, inspect your trimming cutters, and check that top and bottom trimmers are set flush without digging in.
Quick Reference: Peeling Symptoms and Fixes
| Symptom | Likely cause | Instant fix |
|---|---|---|
| Tape peels cleanly, little glue on panel | Glue too cold or panel too cold | Raise glue temp per data sheet, acclimatise panels |
| Burnt smell, dark glue | Overheated adhesive | Lower temp, clean and refill glue pot |
| Dust or crumbs on glue line | Poor edge prep | Clean edges, check pre-milling |
| Dry patches on tape | Too little glue | Adjust glue roller gap, clean roller |
| Glue squeeze-out and messy joint | Too much glue | Reduce glue quantity |
| Lifting at ends and corners | Weak pressure or fast feed | Realign or replace rollers, slow feed |
| Tape won’t bond at all | Wrong or unprimed tape, old stock | Match tape and adhesive, use fresh tape |
| Lift starts at trimmed edge | Blunt trimming knives | Sharpen or replace cutters |
How to Repair Peeled Edge Banding Fast
If a finished panel already has a lifting edge, here is a quick repair that works for small sections:
- Clean the area. Lift the loose tape gently and remove dust and old crumbly glue.
- Reactivate or replace the glue. Use a household iron or heat gun on low heat to soften the existing hot-melt, or apply a thin layer of suitable contact adhesive.
- Press firmly. Roll or clamp the tape down until the glue sets.
- Trim and finish. Remove any excess with a sharp blade and a light scrape.
This is a good emergency repair, but it is not a substitute for fixing the root cause on the machine.
Edge Banding Peeling Prevention Checklist
Use this list at the start of every shift:
- Glue pot at the correct temperature and fully warmed up
- Glue pot clean, with no burnt or old adhesive
- Panels acclimatised, dry and dust-free
- Pre-milling cutters sharp and switched on
- Glue roller gap set for the tape thickness
- Pressure rollers clean, aligned and in good condition
- Feed speed matched to material and glue
- Tape fresh, correctly stored and compatible with the adhesive
- Trimming and scraping units sharp and correctly adjusted
- One sample piece peel-tested before starting the batch
Choosing Machinery That Reduces Edge Band Problems
Operator skill matters, but so does the machine. A good edge banding machine gives you stable glue temperature, consistent glue application, accurate pre-milling, strong and even pressure, and clean trimming. These features cut peeling defects and rework at the source. Explore the machines in our edge banding machine category, browse the full Kataria Tech Zone shop, or view our CNC router machines to improve your panel cutting quality before the edge banding stage.
Related reading from our blog:
- Manual Edge Banding vs. Automatic Edge Banding: When Should a Workshop Upgrade?
- Top 7 Machinery Upgrades Every Woodworking Business Needs to Scale Production
- Creating MDF Wall Panels and Decorative Molding Using CNC Technology
- More guides on the Kataria Tech Zone blog
Frequently Asked Questions
Why does my edge banding peel off after a few weeks?
Delayed peeling usually means a weak bond from the start. Common reasons include glue that was too cold when applied, dusty or damp panel edges, or too little glue. Heat, humidity changes and daily knocks then finish the job.
What temperature should hot-melt glue be for edge banding?
It depends on the adhesive. Many EVA hot-melts work at roughly 180–200 °C, while PUR adhesives run lower. Always follow the manufacturer’s data sheet for your specific product.
Can I fix peeling edge banding without a machine?
Yes, for small repairs. Clean the area, reactivate the glue with a warm iron or use a suitable contact adhesive, then press or clamp until it sets. For ongoing peeling in production, fix the machine settings instead.
Does the type of board affect edge band adhesion?
Yes. Porous boards like particleboard and MDF absorb more glue than dense boards, so they may need adjusted glue quantity. Surface contamination and moisture affect all boards.
How often should I clean the glue pot?
Clean it on a regular schedule based on usage. Daily or weekly cleaning is common in busy shops, since old, charred glue is a leading cause of weak bonds.
Is PVC tape better than ABS or PP for avoiding peeling?
No single tape is best for every job. What matters is that the tape, adhesive and board work together, and that the tape is fresh, clean and correctly stored.
Final Thoughts
Edge band tape peeling is frustrating, but it is one of the most fixable problems in a woodworking workshop. Work through the five causes in order: glue temperature, edge preparation, glue quantity, pressure, and tape quality. Test a sample piece before every batch, and most defects will be caught before they reach a customer.
At Kataria Tech Zone, our goal is to help woodworking businesses produce cleaner, stronger and more profitable work. If you want advice on machinery that helps you reduce rework, browse our shop or visit the Kataria Tech Zone blog for more practical guides.