
Acrylic is one of the most rewarding materials to work with on a CNC router — it cuts to crisp, glass-like edges, engraves beautifully, and takes color and backlighting well. It’s also one of the easiest materials to ruin. Push the wrong bit through it at the wrong speed and instead of a clean edge you get a melted, gummy mess fused back onto itself, or worse, a cracked sheet you have to throw away.
The good news: melting acrylic on a CNC router isn’t a materials problem, it’s a settings problem. Get the bit, spindle speed, feed rate, and cooling right, and acrylic becomes one of the most predictable, satisfying materials in the shop. This guide walks through exactly how to do that, step by step.
Why Acrylic Melts on a CNC Router in the First Place
Acrylic (cast or extruded PMMA) has a relatively low melting point compared to wood or metal, and it’s also a poor conductor of heat — meaning the heat generated at the cutting edge has nowhere to go except back into the material. When a router bit spins too fast, feeds too slowly, or takes too deep a cut, friction builds up faster than the material can dissipate it. The plastic softens, re-fuses behind the bit, and you end up with:
- Melted, rough edges instead of clean cuts
- Chips welding themselves back into the kerf
- Cracked or chipped material from heat stress
- A cloudy, “frosted” look where you wanted a polished edge
Every step below exists to solve one core problem: keep the cutting edge cool enough that the acrylic is being cut, not melted.
Step 1: Choose the Right Bit
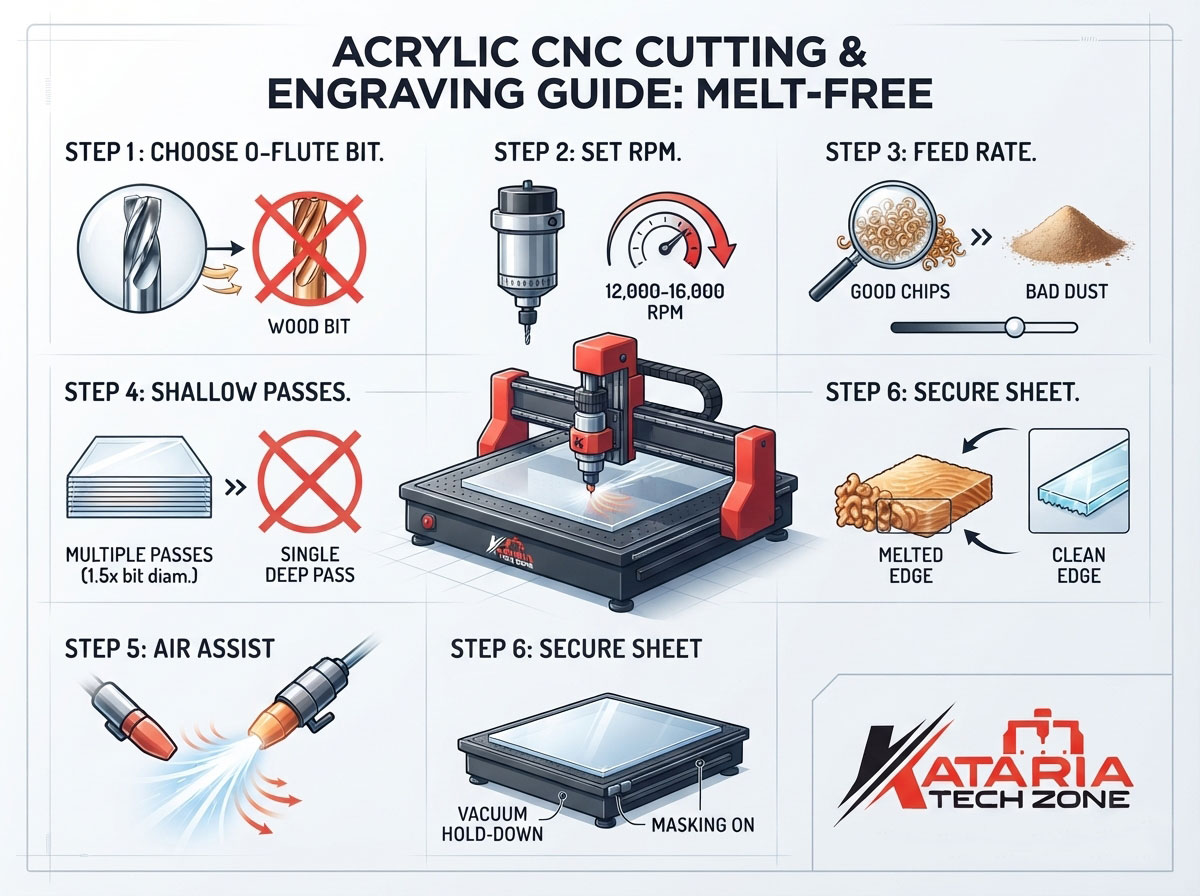
The single biggest factor in a clean acrylic cut is bit geometry. Standard wood-cutting router bits — especially multi-flute bits designed for fast chip clearance in softwood — are the number one cause of melted acrylic.
Use a single-flute, O-flute (also called “spiral O-flute”) acrylic/plastic bit. These are purpose-built for acrylic and plastics:
- Single flute means fewer cutting edges pass through the material per rotation, which generates less friction and heat than a 2- or 3-flute bit.
- O-flute (polished flute) geometry creates a wide, open channel that pulls chips up and away from the cut immediately, instead of letting them recut and generate heat.
- Upcut vs. downcut: an upcut O-flute clears chips efficiently and is the standard choice for most acrylic cutting; downcut bits leave a cleaner top surface but trap chips more, so they’re better suited to shallow engraving than full-depth cutting.
A dull or nicked bit is just as dangerous as the wrong bit — a worn edge rubs instead of shearing, which is pure friction and heat. If you’re getting melted edges on a bit that used to cut cleanly, check it under magnification before changing any other settings.
Step 2: Set the Right Spindle Speed (RPM)
This is where most beginners get it backwards. With wood, higher RPM usually means a cleaner cut. With acrylic, too high an RPM is one of the most common causes of melting.
As a starting point for a single-flute O-flute bit:
- 12,000–16,000 RPM for most acrylic cutting on a standard CNC router with a router-style spindle
- Drop toward the lower end of that range for thicker sheets (10mm+) where heat has more material to build up in
- If you’re running a high-power industrial spindle capable of much higher RPM, resist the urge to max it out on acrylic — dial it back to this range and let feed rate do the work of clean chip formation
The goal is a speed fast enough to shear the plastic cleanly, but slow enough that the bit isn’t spending excess time — and generating excess friction — in the same spot.
Step 3: Match Feed Rate to Spindle Speed
Feed rate and spindle speed have to be tuned together — one without the other is how you end up chasing melting with speed changes that don’t fix anything.
- Feed rate should be fast enough that each flute is taking a proper “bite” of material, producing visible chips rather than dust or fine powder. Fine white powder or dust instead of small chip curls is a clear sign your feed is too slow relative to your spindle speed — the bit is rubbing, not cutting.
- A practical starting range for 3–6mm acrylic on a single-flute O-flute bit is 1,500–3,000mm/min, adjusted based on your machine’s rigidity and the bit diameter.
- If you’re seeing melting, increase feed rate before you reduce spindle speed — a faster feed at the same RPM often solves the problem immediately by reducing the time the bit spends in one place.
Run a test cut on a scrap offcut of the same thickness and batch of acrylic before committing to your final part. Acrylic sheets vary slightly between cast and extruded types, and even between batches, so a setting that worked perfectly last month is worth double-checking.
Step 4: Cut in Multiple Passes, Not One Deep Plunge
Trying to cut through a full sheet of acrylic in a single deep pass is one of the most reliable ways to generate melting and chipping, especially on anything over 3–4mm thick.
- Limit each pass to roughly 1.5–2x the bit diameter in depth (e.g., a 3mm bit taking passes of around 4.5–6mm at most, less on thicker or harder cast acrylic)
- Multiple shallow passes let chips clear fully between cuts instead of packing into the kerf and re-melting
- For engraving (as opposed to full cutting), depth per pass matters even more — shallow, controlled passes give sharp, consistent detail without heat buildup at the tip
If your CAM software supports it, use a ramping or helical lead-in for pocket cuts rather than plunging straight down — a straight plunge concentrates heat at a single point and is a common source of localized melting or cracking right at the entry point.
Step 5: Keep the Cut Cool — Air Blast Is Non-Negotiable
Acrylic’s poor heat conductivity means the heat generated at the cutting edge stays right there unless something actively removes it. An air-assist nozzle blowing directly at the cutting point is the single most effective upgrade you can make for clean acrylic work:
- Compressed air (or a simple air blower attachment) clears chips instantly and carries heat away from the cut in real time
- It also keeps the kerf visible, so chip clearance and edge quality are easy to monitor mid-job
- For engraving especially, where the bit dwells over fine detail longer, air assist is often the difference between crisp engraving and a slightly frosted, melted-looking surface
Avoid flood coolant systems designed for metal — they’re unnecessary for acrylic and can leave residue that’s difficult to clean off a clear or polished surface. Dry cutting with good air assist is the standard for acrylic.
Step 6: Secure the Sheet Properly
Acrylic flexes and vibrates more than wood at the same thickness, and any movement during the cut increases friction unpredictably — which shows up as melting even when your speeds and feeds are otherwise correct.
- Use a vacuum table where available — it holds the full sheet flat and evenly, which is especially important on thin acrylic (under 5mm) that’s prone to chatter
- If using clamps or a spoilboard with screws, keep fixturing well clear of the toolpath and check that the sheet sits perfectly flat with no bow — acrylic sheets can warp slightly in storage
- Leave the protective masking film on the acrylic during cutting. It protects the surface from scratches and swarf, and gives a small buffer against surface marking from clamps
Step 7: Dial In Engraving Settings Separately From Cutting
Engraving (surface marking or shallow decorative work) uses different settings than full-depth cutting, because you’re managing surface finish rather than clean-through chip evacuation.
- Use a shallower depth per pass — often 0.1–0.3mm for fine detail work
- A slightly higher RPM than your cutting setting can actually help here, since you’re removing very little material and a cleaner shear at the surface avoids a frosted, melted look
- Keep feed rate moderate and consistent — engraving is more sensitive to feed rate variation than deep cutting, since any dwell time shows up immediately as a melted or discolored mark
- For high-detail engraving work at production scale, some shops move from a router-style CNC to a dedicated laser machine, since a laser engraves acrylic with zero mechanical contact and produces the deep, frosted “diamond-polished” look popular for signage and awards without any risk of tool-related melting — worth considering if engraving detail work is a growing part of your production
Step 8: Finishing the Edge
Once the part is cut, the edge quality depends partly on your settings above and partly on finishing technique:
- Flame polishing brings a slightly frosted CNC-cut edge to a glass-clear finish by passing a gas flame quickly along the edge — a common step for signage and display work
- Sanding and buffing with progressively finer grits achieves a similar result without flame, useful where flame polishing isn’t practical
- Remove the protective masking film only after all cutting, engraving, and handling is complete, to avoid scratches during the process
Common Mistakes Checklist
Quick reference for diagnosing melted or rough acrylic cuts:
- Melted edges, gummy re-fused chips → feed rate too slow relative to spindle speed, or wrong bit (multi-flute instead of single-flute O-flute)
- Fine white dust instead of chips → RPM too high, feed too slow — increase feed first
- Cracking or chipping at entry points → straight plunge instead of ramped entry, or cutting too deep per pass
- Frosted, cloudy surface after engraving → dwell time too long at one spot; reduce depth per pass or increase feed slightly
- Inconsistent edge quality across the same sheet → sheet not held flat, vibration during the cut, or a worn/nicked bit
Getting the Right Machine for the Job
Consistent, melt-free acrylic work ultimately comes down to having a machine with a stable frame, precise spindle speed control, and a reliable air-assist setup. At Kataria Tech Zone, our CNC Router range is built to handle acrylic alongside wood, MDF, and composites, with the rigidity and control needed to hold tight tolerances on thin sheet material without chatter. For shops doing high volumes of acrylic signage, engraving, or fine detail work, our Laser Machine range — including the 1390 Laser Machine — is purpose-built for acrylic cutting and the deep, frosted engraving look that’s difficult to achieve mechanically.
If you’re weighing a router-based versus laser-based approach for your acrylic and signage work more broadly, our post on CNC Router vs. Traditional Woodworking Tools: Speed, Precision, and Cost Comparison and Innovative Uses of CO2 Laser Machines cover the trade-offs in more depth. And if you’re just getting started with CNC work generally, Getting Started With CNC Routers For Woodworking: A Beginner’s Guide is a solid foundation before moving into plastics.
Frequently Asked Questions
What RPM should I use to cut acrylic on a CNC router? Start around 12,000–16,000 RPM with a single-flute O-flute bit, adjusting down slightly for thicker sheets where heat buildup is more of a concern.
Can I use a regular wood router bit on acrylic? Standard multi-flute wood bits are the most common cause of melted acrylic — they generate more friction and clear chips less efficiently than a purpose-built single-flute O-flute plastic bit.
Why does my acrylic keep melting even at low RPM? Usually a mismatched feed rate — if you slow the spindle down but don’t adjust feed accordingly, the bit still dwells too long in the same spot. Increase feed rate first, and confirm you’re getting actual chips rather than fine dust.
Is a laser better than a CNC router for acrylic? Both work well — a CNC router is often more economical for cutting thicker sheets and mixed materials, while a laser gives a distinctive frosted, polished-edge finish that’s popular for signage and is essentially melt-risk-free since there’s no mechanical contact.
Summary
Melt-free acrylic cutting on a CNC router comes down to a handful of controllable factors: the right single-flute O-flute bit, spindle speed in the 12,000–16,000 RPM range, a feed rate fast enough to produce real chips rather than dust, shallow multi-pass cuts, active air cooling, and a securely fixtured sheet. Get those right, and acrylic becomes one of the most reliable and visually rewarding materials to run.
At Kataria Tech Zone, we help woodworking and fabrication businesses across India choose and set up the right CNC and laser machinery for exactly this kind of precision plastic work. Browse our full machine range or get in touch for a personalized recommendation.


One thought on “Step-by-Step Guide: How to Cut & Engrave Acrylic Sheets on a CNC Router Without Melting”